How to Organize Cords and Cables So You Can Actually Find What You Need
- Michelle Urban
- Nov 20, 2025
- 7 min read

Updated: Jan 6
Cord management is one of the most common areas clients ask us to help with. Almost every home we work in has some version of the cord and cable dilemma. It’s one of those small problems that quietly turns into a constant annoyance. When we start sorting through cords, clients usually say things like:
“We have every cord, cable, and charger under the sun... except the one I need.”
“We have every outdated charger known to man.”
“Someone in the house thinks everything needs to be kept ‘just in case.’”
“No one actually knows what half of these cords belong to anymore.”
Sound familiar?
What makes cords especially tricky is that they don’t belong to just one room or category. They move with us — from office to car to travel bag to junk drawer — and without a clear system, they quietly multiply and scatter over time. New devices only accelerate the cycle, bringing even more cords and chargers into the house.
An Organizational System That Works in Real Life
In this post, we’re sharing our exact step-by-step process for how to organize cords and cables. You’ll identify what you have, let go of what you don’t need, and create a simple, maintainable system for storing and labeling cords so they’re easy to find and return. This isn’t just cable management — it’s a system that makes a difference.
Step One: Gather Every Cord, Cable, and Charger You Own
Before you can organize, you need to collect everything. And yes — this means digging deep. Check desk drawers, entertainment centers, junk drawers, tool benches, travel bags, nightstands, cars, bathrooms — anywhere cords tend to land.
Once you’ve gathered everything, spread it all out on a counter, table, or the floor.

Seeing everything together is the only way to spot duplicates, outdated items, and cords you forgot you even owned.
Time allotment: 15–25 uninterrupted minutes
Step Two: Group Like Cords and Cables Together
Once everything is laid out, start grouping like items together. Don’t worry about names or technical details yet. This step is purely visual.
Match cords that look the same and place them in the same pile. Put cords with the same ends together, duplicate charging cables together, and like power cords together. You’re not labeling or deciding what to keep yet. You’re simply creating order so you can clearly see what you’re working with.

Time allotment: 25–40 uninterrupted minutes
Step Three: Identify Each Cord, Cable, and Charger Type
Now that everything is grouped visually, it’s time to identify what you’re actually looking at. This is often the most time-consuming part of the process — and one of the most impactful.
Use our reference guide or a tool like ChatGPT to help identify unknown cables. Labeling each cord now will make the next steps much faster.


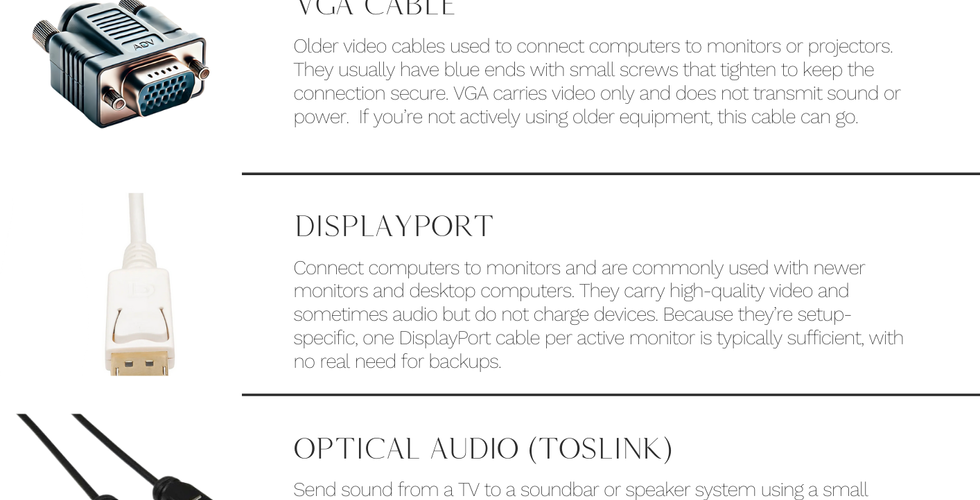


Once you’ve identified an item, jot the name down on a sticky note or a piece of painter’s tape and keep it with that cord. You don’t need to label perfectly yet — this is just prep work that will make the upcoming steps much easier.

This step is about understanding what you have — not deciding what stays. Clarity now makes future decisions much easier.
Time allotment: 30–90 uninterrupted minutes
Step Four: Decide Which Cords and Cables to Keep
Now that you know what each cord is used for, it’s time to decide whether it actually deserves a spot in your home (and how many you really need). This isn’t about perfection — it’s about being realistic.

For example, you might come across an old charger. Does it stay or does it go? If you’re unsure, ask yourself:
Do we still own the device this cord belongs to?
Has this been used in the last year?
Do we need more than one of these?
Would it be easy to replace if needed?
Could I get this from my local Buy Nothing group?
Most households need only one to three of each cord type. Current charging cables might justify a few extras. Specialty cables and outdated chargers usually do not.
Time allotment: 30–45 uninterrupted minutes
Step Five: Choose One Dedicated Storage Location for Cords and Cables
Now that you’ve narrowed down what you’re keeping, it’s time to decide where they’ll live.
Before buying bins or containers, choose a single home base. All cords should be stored together in one dedicated location. Splitting them across multiple rooms is how systems break down. When people don’t know where something belongs, it usually ends up in the nearest drawer.

Choose a spot that makes sense for your household. Intuitive, visible, and low-effort locations are most likely to stay organized over time.
A designated drawer in a laundry room
A cabinet in a TV room or office
A shelf in a utility or storage closet
A spot in a mudroom or entry closet
A door with a hanging organizer
When choosing a location, prioritize function over perfection. The goal is easy access for everyone who might need a cord. I've not just the most organized person in the house. Think about who uses chargers most often, how frequently cords are grabbed, and whether the location allows items to be returned just as easily as they’re taken. A spot that’s intuitive, visible, and low-effort is far more likely to stay organized long term.
Time allotment: 10–15 uninterrupted minutes
Step Six: Choose Cord Storage That Matches How Your Household Uses Cables
Now that you know where the cords will live, decide how they’ll live inside that space.

The goal isn’t perfect containment — it’s creating just enough structure so cords are easy to grab, easy to see, and easy to put back.
Think about:
Do these items need to be visible to be used?
Are cords returned neatly, or dropped in quickly?
Are some cords used often while others are rarely touched?
Good storage options include divided bins, clear photo storage boxes, vinyl mesh pouches with labels, or compartment boxes for bulky chargers.
Inserts in a bin are ideal for separating smaller cords and adapters so they don’t tangle or pile up.
Clear photo storage boxes are helpful when visual categories matter and you want to quickly see what you have.
Vinyl mesh pouches with labels are great for specialty or rarely used cords that still need a clear home.
Compartment boxes are best for bulky power bricks and chargers that don’t stack well.

Time allotment: 30–90 uninterrupted minutes
Step Seven: Label Cords and Cables Clearly and Simply
By this point, you’ve identified what each cord, cable, and charger is used for and decided what’s staying. Now it’s time to label.
If you’re focused on function and want something quick, painter’s tape and a Sharpie work just fine. If you want a more polished, long-term solution, a label maker or printed labels will give you a more tailored and structured look.
For a clean, consistent result, we recommend following our TOH labeling guidelines, which outline how we approach font choice, casing, tape width, and placement. You can read the full breakdown in Our Labeling Process: The Finishing Touch to an Organized House. That said, a labeling system doesn’t need to be complicated to work — it simply needs to be clear and consistent.
One effective approach is to use simple labels that are easy to recognize at a glance. Whichever labeling method you choose, the key is to stick with that system throughout. Here are a few common naming conventions that work well.
Label by cord or charger type, which is ideal for shared spaces and cable bins:
USB-C CHARGER
HDMI CABLE
LAPTOP POWER CORD
POWER BRICK
You can also label by how the cord is used, which is helpful when similar cables serve different purposes:
AIRPODS CHARGER
WIRED EARBUDS (TRAVEL)
WORK LAPTOP CORD
VW CAR CHARGER
Or label by who it belongs to, which works especially well in homes with multiple people or shared charging areas:
HAAKON’S IPHONE
ELLA’S IPAD
MICHELLE’S P-TOUCH CUBE
FAMILY IPAD
However you label, consistency and easy identification matter most. The goal is for anyone in your household to glance at a label and immediately think, “Yep, that’s the one.”
Another important part of labeling is matching the label size to the container. Smaller containers, like photo storage boxes, usually look best with narrower label tape, while larger containers, like vinyl mesh pouches, can handle wider labels that are easier to read.
Lastly, tape color matters. Clear tape is subtle but harder to see at a glance, while white or black tape stands out and is easier to read quickly. When in doubt, choose clarity over aesthetics.
Time allotment: 30 - 120 uninterrupted minutes
How to Organize Cords and Cables in a Way That Stays Organized
This is one of those organizing projects with a high return on effort. You don’t need new products, technical knowledge, or a full weekend — just a little focus and a clear plan. Set aside some uninterrupted time, work through the steps, and give your cords a system that actually works.
If you tackle this project, we’d love to see it. Tag and mention @theorganizedhouse.co on Instagram to share your finished setup. And if you get stuck or have questions along the way, don’t hesitate to reach out — we’re always happy to help.
Bonus Tips for Long-Term Cord Management
Maintaining your organized cord system is just as important as setting it up. Here are some bonus tips to ensure your cords stay organized:
Regular Check-Ins: Set a reminder every few months to review your cord collection. This helps catch any new additions and keeps clutter at bay.
Involve the Family: Make cord management a family activity. Teach everyone where cords belong and how to return them after use.
Stay Updated: As technology changes, so do our cords. Keep an eye on new devices and chargers that may require adjustments in your organization system.
Use Technology: Consider using apps that help track your devices and cords. This can be especially useful for families with multiple gadgets.
Be Mindful of New Purchases: Before buying a new device, think about the cords it will require. This can help prevent unnecessary clutter from accumulating.
By following these steps and tips, you can create a cord management system that not only looks good but also functions well for your family. Enjoy the peace of mind that comes with a well-organized space!